Many first-timers are looking at this:

or… you may be here:
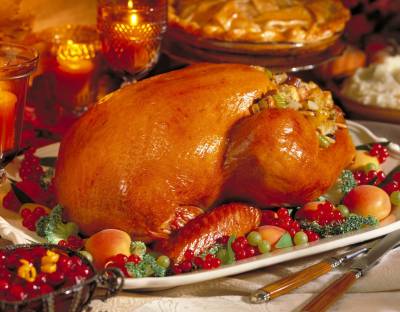
and you’re hoping to turn it into this:
Well, not to worry, I’ve got your six, I’ve got you covered.
I wrote this out to be idiot-proof – literally taking you step to step. Here you go:
First, a few notes. If you’re still buying your turkey, go with a fresh one – it’s almost too late to dethaw. However, if you’re stuck with a frozen – begin to dethaw immediately. Put it on the counter, still in its package and leave it alone until tomorrow. Plan to eat late.
Second: size – the butcher can help with this, it depends on the number of people you’re cooking for. Some people recommend letting the bird dethaw in water – can’t hurt, might help – keep it in the wrapper though.
List of what you need – print out and take to the market with you:
Turkey
Roasting Pan
Aluminum (tin foil wrap)
Stuffing Ingredients:
1-2 loaves of sliced white bread – (you’ll use the second for turkey sandwiches later)
1 “bunch” of Celery
2-4 onions (depends on the size of the onions and the turkey)
4-6 eggs
2-4 cubes of butter
Poultry Seasoning (you’ll find it in the same aisle as salt, pepper and the packaged gravy mixes)
Salt
Pepper
Flour – for the gravy if you’re making from scratch
Other dishes for the meal:
frozen corn
frozen peas – with or without cocktail onions
mash potatoes – make from scratch, the box flake type, or, fabulous: get the ones that come in a tub and heat up in the microwave – get 1-4, depending on how many people.
dinner rolls – be nice to yourself – get the ones already made and just heat ‘em up
cranberry sauce – get the one that comes in a can – looks like a small barrel made of jello – it’s not, trust me.
Gravy – you can make this from the turkey juices with a bit of flour (see below), or use a package of gravy mix – that way you can pick the color – creamish or rich brown.
Pie(s)
Whip Cream and/or Ice Cream
Drinks – wine – your preference, milk or whatever.
Alright – your turkey is dethawed – give yourself six hours advance for starting the turkey and dressing. This is because it takes almost that long for the turkey to cook.
Goal: A perfect turkey with great homemade stuffing.
1. Take the turkey out of the bag/wrapper thing it came in.
2. Check inside the cavity, the chest, the open hole found between the legs of the turkey. There’s a small bag of stuff. Take it out and throw it away. Yes, throw it out. We’re into simplicity here. Others will tell you all the things you could do with it. Throw it out.
3. The cavity should now be empty. It might still have ice in it. S’okay. Rinse it with warm to hot water. Rinse the entire bird with special attention to the cavity and the butt. The butt is the back end of the turkey – it has a little flap. Lift the flap, make sure it’s empty and rinse it well. Put it on a plate or leave it in the sink for now.
4. Get out the roasting pan you’re going to cook it in. If you don’t have one, buy it at the grocers. It has to have some depth, length and width to it – turkeys produce a lot of juice and you want those juices to stay in the pan, not overflow in your oven.
5. Keep the roasting pan handy. You’re going to throw all the ingredients for the dressing into roasting pan and mix ‘em up from there. Ready?
6. Prepare the stuffing: toast the bread – the whole loaf. While you’re waiting for the toast, start chopping the onions and celery (wash the celery stalks). As you’re chopping and toasting, take the finished toast and tear it into bite size pieces.
7. Pre-heat the oven to 375 degrees. Take out all the racks except the one on the bottom shelf/ledge or next up.
8. Keep chopping and breaking up the toast and tossing it all in the roasting pan.
9. Take the 4-6 eggs – crack ‘em and toss the egg contents into the roasting pan. Throw out the shells. Don’t worry about beating the eggs – just toss the whole inner contents onto the toast, onions, celery.
10. Melt the 2-4 cubes of butter in the microwave. Pour it onto the toasted bread pieces, the chopped onions and celery and the eggs.
11. Salt, pepper and shake some of the poultry seasoning over the toasted bread pieces, the chopped onions and celery and the eggs.
12. Plunge your hands into the roasting pan and start tossing the contents so as to mix ‘em up really well. Smash the eggs between your fingers as you’re tossing the contents.
13. Pause. After tossing the contents, they should be loose, but coated with the eggs and butter. Taste it. It’s okay. See if it needs some more salt, pepper or poultry seasoning. Add that if it does. Taste it again.
14. Put the bird in the sink, if you didn’t leave it there. Take fistfuls of your raw mixed stuffing and stuff the inner cavities – both the front and the back. Really stuff it. It should be bursting with stuffing. Mind you, that bird will probably slip and slide a bit in the sink. That’s okay – just get the stuffing inside both ends.
15. Any leftover raw stuffing, put in a container and put it in the refrigerator – it makes for great scrambled eggs with the stuffing later. Or just toss it out.
16. Take the stuffed turkey and put it in your roasting pan, which is now empty – do not clean the roasting pan – not necessary. Just plop the turkey into the roasting pan.
17. What to do about the legs? It’s better and neater if you can get them to fit into that annoying flap of skin at the front of the cavity. If not, bring ‘em as close together as you can and tie ‘em together with thread or string or wire.
18. Don’t fuss about the wings – just make sure they fit inside the roasting pan.
Cooking the Turkey:
1. Okay, the bird is now stuffed and it’s sitting inside the roasting pan. Your oven has been pre-heated to 375 degrees. Put the uncovered bird into the oven. Cook for 30 minutes.
2. Turn the oven down to 325 degrees.
3. Tear off enough aluminum foil to “tent” the bird. To do this, you use a potholder to bring the rack out far enough to give you access to the bird. Carefully put the sheet of tinfoil over the bird so it’s shaped like a tent – crinkle the sides a bit so it stays in place – but only the sides – you want the heat circulating over and around the bird.
4. Remaining cooking time: If the bird weighs 15 lbs and under – it cooks for 20 minutes per lb. So, 11 lbs x 20 minutes = 220 minutes divided by 60 (one hour) = 3.6 hours – if it goes for four hours, that is okay. For 16 lbs and up – it’s say, 18 lbs. x 15 minutes = 270 minutes divided by 60 (one hour) = 4.5 hours = 4 and one-half hours.
5. Now, clean up the kitchen and go watch a movie or two. LEAVE THE BIRD ALONE. IT’S COOKING. DON’T FUSS WITH IT.
Turkey is done, now what?
1. Carefully remove the roasting pan from the oven. Watch it! That juice is very hot and you don’t want to burn yourself. Leverage the bird out of the roasting pan and put it on a plate or cutting board. Leave it alone. Turn the oven off.
2. You now start preparing all the side dishes – the peas, the corn, the mash potatoes. the gravy, heating the dinner rolls. Follow the directions.
Homemade Gravy:
1. You can make the gravy in the roasting pan if you’ve two burners to spare, but usually because of preparing the side dishes – if you’re not using the microwave – just pour (carefully!) the juices into a big saucepan. It’s okay for some scraps to be in there, but any large ones, remove ‘em.
2. Turn the heat on low to medium under the saucepan now filled with the turkey juices.
3. In a cup or a mug, pour some flour and add cold water – a rule of thumb is 2/3 flour, 1/3 cold water. Using a fork, stir this well in the cup or mug – break up the bits of the flour by pressing the fork against trapped bits of flour against the sides of the cup or mug.
4. Pouring the flour-water mixture, a lit bit at a time into the heating juices in the saucepan, using the fork to continual stir the flour/water into the juices so that it mixes and thickens simultaneously. Keep doing this until the gravy is of the consistency you like. Turn the heat down to low, real low so it just stays warm.
Alrighty – back to the Turkey:
1. Remove the dressing from inside both the front and back ends/cavities. Scoop it out with a spoon and put in a serving dish. Get it all. Put the stuffing to the side with all the other dishes that are now prepared or being prepared. You can cover it with some aluminum if you are concerned it won’t stay hot.
Formal or Informal Serving of The Bird and Side Dishes:
So, it’s time to serve:
Informal:
1. Call your guests into the kitchen. Pick the person who is going to carve the bird. Everybody should be oohing and aahing over your gorgeous bird sitting on a plate or on the cutting board. If they are not, mark it down for next year and don’t invite them.
2. The turkey carver – uses a fork and a sharp knife – he/she/you plants the fork into the bird so it doesn’t move around and you begin peeling off the skin from the flesh of the turkey – toss it. The legs – these really should be falling off the turkey, but if not, grab the bone side and wiggle it – it may still stay attached to the turkey because of its skin, so just cut the crusty skin away from the turkey and place the legs to the side. Same with the wings. (Don’t bother peeling the skin from legs and wings – it’s rare they get eaten anyway.) Slice up the turkey. As you’re slicing, put the slices on a plate.
3. Everybody get a plate and start serving themselves and taking it back to where they are going to eat. Wait for everybody to assemble.
Formal:
Put all the dishes on the table, which is set for the dinner. Light the candles. Call everybody to the table. Say grace and/or thank you by each member – that is after all what this day is about. See Step No. 2 under Informal above for carving the turkey. Pass the dishes around the table.
Enjoy the food. You did it.
Filed under: Commentary - Modern Times, WPLongform Tagged: Easiet Turkey Recipe, How to Make a Turkey, Step-by-Step, Thanksgiving


